Member Project: Raspberry PI Arcade
I’ve been gathering the various parts needed to create a Raspberry Pi 3 powered arcade machine. Specifically a smaller ‘bar-top’ style arcade cabinet.
Beginning with a ‘Liquid Video’ brand LCD monitor, which was a free score through some donated time and effort at the shop (We had a lot of computers and monitors donated to the shop by a local tech giant, and in upgrading all our old monitors, well I scored one of the cast-offs for my project).
The Raspberry Pi 3, of course, is the heart of the system. Adding an external hard drive connected via USB (donated to the project by a friend), an ATX power supply I scrounged up from the pick-a-part pile..a 2.1 speaker system I had recently upgraded at home, and some other odds and ends.
The last portions of the project were a joystick liberated from an ‘iCade’ iPad arcade accessory (donated to the project by another friend) and a bunch of parts ordered through aliexpress.com
It’s not much to look at just yet.

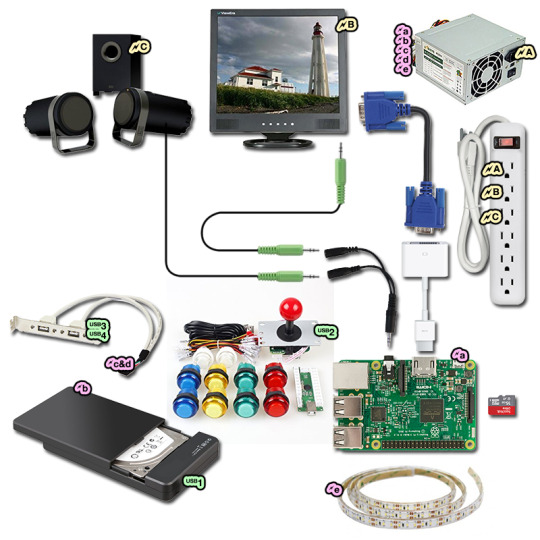
But as of last night, all the parts were again working together. You can see in the picture above, the speaker set behind the monitor, the monitor itself, and in front, you can see the hard drive, and the raspberry pi, as well as the power strip that’s running everything.
Unseen still, the ATX power supply (it was sitting behind the monitor) and the Xbox controller that I was using because the arcade controller hasn’t been assembled yet (but you can totally see the bag of colorful buttons)
I’ve worked up a bit of a flowchart for the project’s connections.. I think it makes it easier to understand the whole plan.
You’ll notice that there are two green audio cables coming off the Raspberry Pi.. this was actually a ‘bug’ that I ran into that I decided to turn into a feature.
When I got the monitor, it had built-in speakers. At first, I was excited, but on plugging them in, I realized they were very low-powered speakers, probably best used in an office environment. Arcade games demand more sound, so I set about freeing up my home PC’s 2.1 sound system. Then I realized I had an opportunity to have the monitor’s built-in speakers function for ‘low volume’ sound times.. and then I can dial up the volume on the 2.1 system (with subwoofer) for those times when I want a more full-featured arcade experience.
So in a way, I’m making a 2+2.1 sound system.
Last night, I cracked open those speakers to strip off all the plastic shells and spent some time soldering an extension cable so that the 2.1 system’s volume control knob could be moved to anywhere I wanted in my build, instead of being tethered to just a couple inches from the right speaker.
I’ve given some thought to the layout of the control panel, and I’ve worked up this sketch of what it might look like.

Not my artwork, just trying to get a feel for how it might work.. and I figured, why not have some fun while I was doing that.
ABXY are placed in a similar way to the Xbox controller (backward to the Nintendo, sorry). L and R will be the left and right ‘shoulder’ buttons.
I’m not planning to try to fit the left and right trigger buttons into this design, as most arcade and classic home gaming emulators top out at 6 action buttons.
My cabinet design is going to have two USB ports in the front, so if needed we can plug in a PlayStation, Xbox, or Nintendo-styled controller, to get the full effect for a given system.
There’s also going to be a rectangular button that mimics the traditional red ‘coin return’ buttons. You won’t be able to put coins into it, but pushing this button will trigger a ‘coin inserted’ event in the games, at least on the arcade emulators. for classic home systems.. I suspect it’ll act as a “Select” button.
The final console layout is one of the last steps of the project, and there’s definitely a lot still to be done before we get there.
Tomorrow’s work will start with the process of removing the monitor’s internal electronics from the plastic shell, and likely creating another extension cable so that the monitor’s power button and menu controls can be located on the cabinet where desired.
For now tho, it’s a project!